Whitepaper
www.theinterwiki.com
The Interventional Services Wiki
The Cardiac Cath Lab is one of the more detail-oriented departments in the hospital. Similar to the OR, every physician has their own preferences. Unlike the OR, even similar procedures can require different equipment and access routes. This creates a complex problem for CCL staff that need to prepare for cases quickly and efficiently.
Every facility tackles this problem in varying ways. From a large binder with glove charts and long lists of materials to a piece of paper taped to the wall with numerous hand-written notes and crossed out sections.
However, in this modern day, we all carry powerful computers around with us everywhere, constantly used for all facets of our day. This technological shift has caused many preference and procedure notes to devolve into a mishmash of both digital and paper references, all of which may (or may not) match up with actual current preferences.
Aligning with this shift in technology, the internet can be used to maintain a single copy of the notes so that everyone can access them quickly and know it's the latest version, as well as who made the latest changes and when. The use of web-based notes allows CCL staff to adapt far more quickly and accurately to new procedure preferences than is possible for any static list (or lists). There are plenty of ways to accomplish this: static websites, shared documents (Google Docs, etc.), Spreadsheets, and Enterprise-level knowledge bases like Microsoft Sharepoint.
An often overlooked option is the wiki.”Wiki”, a Hawiian word for “quick,” was chosen by Ward Cunningham, the creator of the original software, to describe “the simplest online database that could possibly work” —Cunningham, Ward (June 27, 2002), What is a Wiki?, WikiWikiWeb,
That original software called the “WikiWikiWeb” has since evolved and branched into several software solutions under the umbrella term “wiki”. One of the most used and best developed programs available is MediaWiki. MediaWiki is open-source, and runs the world’s best known wiki website: Wikipedia.com.
A wiki has several key features that make it ideal for this type of project:
- Easily edited. (utilizes a web-based interface and simple wiki text code)
- Available from a desktop computer or mobile device.
- Familiar interface. (Who hasn’t used Wikipedia?)
- Secure and vandalism resistant. (With proper precautions)
- Robust ecosystem of add-ons and extensions
- Extensively vetted, open-source code.
- Tracking who changed what, and when.
In our quest to design a system that works the best for our complex structural heart program, we chose to use MediaWiki. The original plan was to keep this website inside the firewall for our facility. However, due to some policy and external access issues, we installed the software on a virtual server hosted by Amazon Web Services (AWS).
We further enhanced the software with several extensions, the most important of which is called Semantic MediaWiki. This extension allows us to treat each page of the wiki as a database record with definable fields such as glove size, closure device preference, radial cocktail etc. for Physician pages, and Manufacturer, IFU link, and such for equipment pages. These fields can be searched, listed, and sorted easily. This allows for things like a grid style physician preference page for quick access, and more detailed info if you click through to the individual Doctors page. This also saves time as any change to the Physicians individual page propagates through to the grid page.
Other extensions installed improve the site in other ways: Visual Editor for editing or creating a page without dealing with the actual wiki text code. Page Forms automatically generates a form for data entry. And Secure HTML for adding content hosted from other sites without increasing the chances of being hacked.
Speaking of hacking, I’ll detail here some of our other policies and configurations to the site as we experienced some malicious actors early on.
Attempting to stay true to the open spirit of a wiki, the decision was made from the beginning to allow anyone to create an account. This encouraged staff to join the project, and saved time for administrators. About 60-90 days after the wiki went live, it was noted that an unknown user had created an account. After checking around, we found that the user had created a page with some very suspicious links! One of MediaWikis strengths is the ease with which one can roll back any changes to pages, and quarantine malicious users. Consider how many people access Wikipedia daily, and it’s easy to see why some robust content management is crucial.
So, considering this to be an isolated event, we deleted the malicious pages, blocked the user, and moved on. Over the next 30 days or so, we experienced ~5-7 similar intrusions. None of them created pages that would be mistaken for any of our actual information, so the likelihood of a user clicking one of the links was very low. This led us to assume that this was an automated system looking for the MediaWiki standard login page. Once it identified an open wiki, it generated a username, password, and used the account to create a page with semi-random text with malicious links.
Again, these users and their pages were dealt with, but the problem was getting worse. So the decision was made to remove the open login functionality. MediaWiki has the ability to confirm new users by email, which would probably keep most of these bots away, but the decision was made to turn off all front end account creation and add users from the back-end by a site administrator. The vast majority of participating staff had accounts at this point, so the added hassle of manual account creation is limited to infrequent occasions. Since this change was made, we have experienced zero successful hacks to the site. I say successful as it’s difficult to determine if attempts are being made that don’t succeed.
Update: While this paper was in final draft, the account creation feature was turned on for 24 hours to allow several new staff and travelers to create accounts. During this period, 2 malicious accounts were created, neither of these accounts performed any actions, and were subsequently quarantined and blocked. So it is, and will continue to be, an ongoing threat.
The other facet to keeping a site like this running is user management. Participation at our facility follows the 90/10 rule. 90% of the changes to content come from 10% of the staff. In the early stages of content creation, frequent curation of added content was necessary. Again, the wiki software is designed to make this process as streamlined as possible. When a page is edited by a user below a pre-chosen access level, the page is marked for “patrolling”. Administrators with the proper privileges can then check these edits and either roll them back, edit, or mark the page as patrolled. As mentioned earlier, during the initial roll out of the site, frequent patrolling was required to enforce content structure and formatting standards. Most of the early pages were copied out of Word documents and pasted into the Wiki with mixed results. Resulting in almost as much time spent cleaning up as it would have taken to type them in manually with proper formatting. Currently, patrolling is rarely necessary, and “catching up” on the latest changes in procedures is accomplished by reviewing the “Recent changes” page on the wiki.
In creating a resource like this, participation from the staff is necessary for success. It also helps to have physician participation, but it’s not essential. As with any change in procedure, there is inevitably push back from those affected. Initially, staff were reluctant to have to go to the computer to access the information when they were used to “checking the book”. Also, there was a tendency to print the pages out for reference during the case and then keep the pages afterwards. After pointing out that these pages were probably going to be “out of date” quickly, printing became much less common. Adding a mobile responsive “skin” to the wiki helped with this problem as most people access the wiki from their mobile devices. To further accelerate this trend, we installed a QR code on the front page of the wiki that points to that same page. This enables people to bring it up on their phone and allow another staff member to scan the QR code from their phone to access it.
Our primary structural heart operator, Dr. David Daniels, has committed fully to using the wiki for his procedure preferences, and it’s understood that the wiki is to be consulted before his cases. As he makes changes to his procedures, the wiki is updated ASAP. This is where the simple interface is extremely handy.
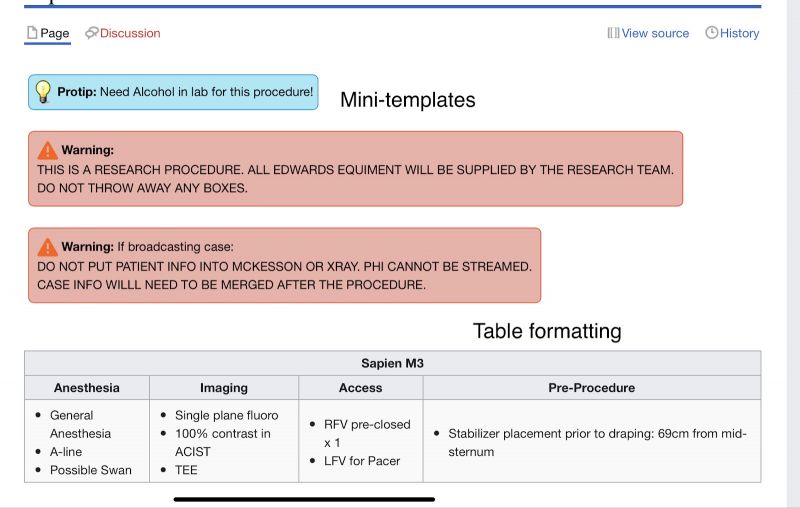
As with Wikipedia, we adopted some standards and practices to keep the wiki useable. For procedure pages, we attempt to keep the format of the pages similar, keeping product to be pulled at the top of the page, sometimes separated by location or type, and a detailed overview of the standard steps to do the procedure below that. There are templates for common pages, and special mini-templates allow for highlighted notes, tips, and warnings. Tables are possible with a bit of WikiText formatting. (As shown below)
The next section demonstrates some of the easy to use features of MediaWiki:
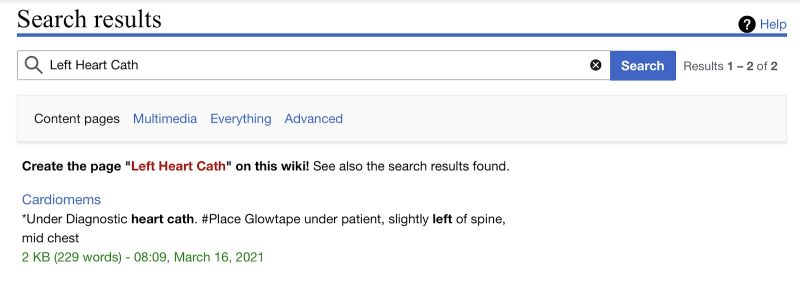
Searching for a page in the search box:
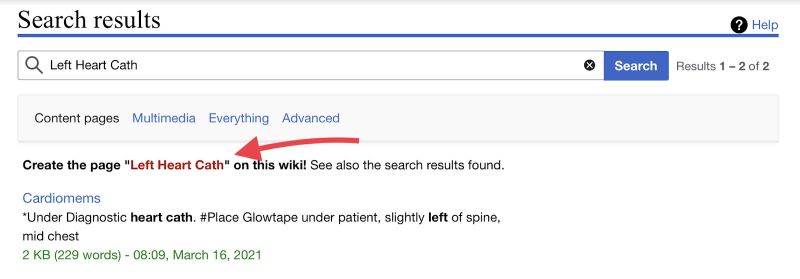
If the page you are looking for is shown, you can click on it. If not, and you have searched for the exact title you want, click on the link to create that page, as shown in the next image.
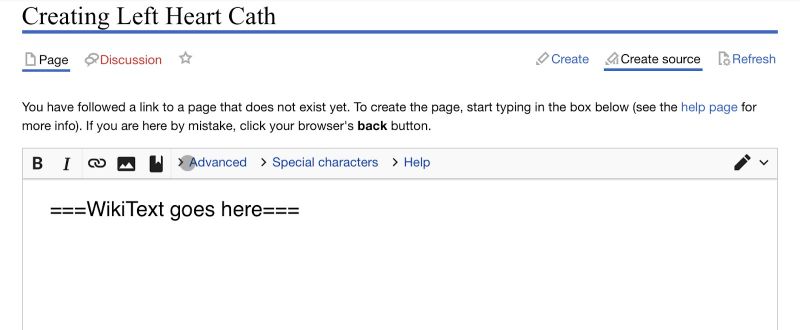
This brings up a blank page with the title you searched for.
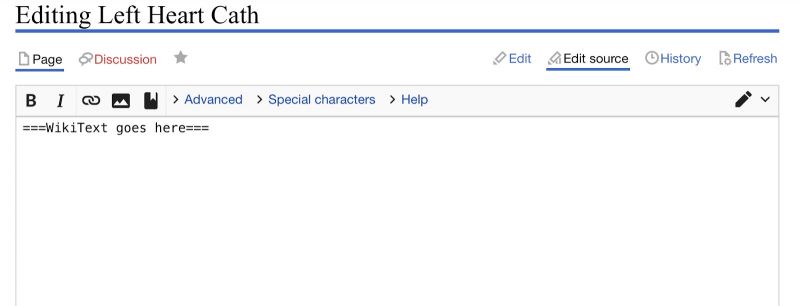
We have added some formatted text here. The 3 equals signs make this text a 3rd level sub-heading. Click “submit” at the bottom of the page and you will see the results!
Further edits of this page is as simple as selecting “Edit” for What You See Is What You Get (WYSIWYG) editing, or “Edit source” to access the WikiText code directly.
Certain portions of the page are more easily edited in the WikiText. For example, to add a category to our Left Heart Cath page, we can add the following text to the page:
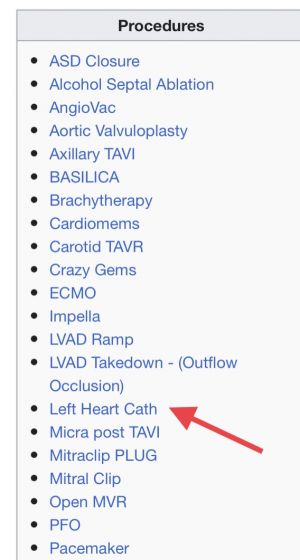
When saved, this page will be automagically [sic] added to our front page index in the Procedures column. Courtesy of Semantic Mediawiki.
Owing to the open nature of a wiki, we chose to have the information available whether you are logged-in or not. Editing is allowed after you are logged-in. And as previously mentioned, accounts are created manually from the back-end command-line interface.
How to create a wiki of your own.
This section will be a mix of technical information, and explanations in non-technical terms.
First, the server. It doesn’t need to be very powerful to keep up with the average-sized department. A decent amount of drive storage is recommended. We opted to use AWS and started with the smallest free-tier server, with the plan to upgrade if more power was needed. So far, we haven’t had any issues.
MediaWiki is designed to run on a LAMP server. This stands for Linux, Apache, MySQL, and PHP. Most websites are hosted on this combination of software. There are many different ways a server can be provided. Some might prefer to host it locally, but the easiest is using a web hosting service. Based on prior experience with AWS, this was our solution.
AWS has a few different options at this point, ranging from do-it-yourself to a fully installed plug and play server. For a proof of concept, we chose a ready to go LAMP server with MediaWiki pre- installed. At this stage, we opted to stick with an IP address for staff to use before buying a domain name. As a few procedures were added to the site, and key contributors saw the benefits, plans were made to expand the capabilities of the site. This presented a few problems. Most of these pre-made servers are standard installs with no real provisioning for add-ons. One of the deal-breaker items in our lab was the ability to edit the pages in a WYSIWYG environment. The extension for this is called Visual Editor, and at the time was very particular about how it was installed. The other important extension, Semantic MediaWiki(SMW), had its own ideas about what was needed for it to run. So, with the proof of concept wiki up and running on a trial basis, we decided to build a server from the ground up fully customized for our needs.
After building and testing the software and extensions, the domain name was purchased, the database with the procedure information, and user data was pushed to the new server, and launched to the web.
Fast forward 18 months. We have ~100 content pages, 1,759 page edits, and 2 active editors. 10 months ago, a new build was undertaken with all major software upgrades included. Visual Editor plays much better with the other kids now, and many of the manually installed extensions are now accomplished by checking a box in the MediaWiki install dialog. These full rebuilds will most likely occur every 6-12 months. During the build process, a snapshot of the server was taken during testing of the configuration but before the database was migrated. This gave us a clean template of the wiki without any data. Based on overwhelming positive feedback on this project, we are making this snapshot available to the Interventional community.
We will conclude this paper with an overview of options available to set up your own wiki. Please be aware that ALL of these options require some Unix and command line experience to manage.
- From scratch on your own server. This option is the most secure, but also the most labor intensive. If the server is inside your firewall, special accommodations will need to be made for staff to view it from their mobile devices. You can look at the demo wiki at www.TheInterWiki.com to get an idea of what you need to install.
- From scratch on a hosted server. You will need a virtual server with full root access. We run our lab wiki on a micro Amazon server to give you an idea of what specs you need. As above with the first option, the demo wiki can serve as a template for your site. This hosted server can be any hosting company, including Amazon.
- Using our pre-built Amazon Machine Image (AMI). This option is the fastest way to have a functioning wiki. You need an Amazon Web Services (AWS) account, and select our AMI from the Marketplace. Since the image is provided free of charge, and it can run on the free tier micro server, up-front costs should be limited to your domain name and small monthly charges from AWS. You will need UNIX command-line experience to make changes to the configuration files and security settings. Instructions are provided, and expert help and support options are available through from us through the AWS support interface.
Please visit our demo wiki at www.TheInterWiki.com to see it in action, read the FAQ, and see how easy it can be to bring your labs extensive procedural knowledge into one simple and accessible location.
